Nowadays, it is very possible that the desktop of an individual’s computer can resemble that of a sweeping Vista; that is, it becomes so large and pretty expansive and provides you with a bird-eye view of an overview of the land with the different applications and system utility programs that you have opened.
Sometimes, seeing what is on the desktop can prove a little bit difficult, especially in a case where the person’s eyesight is not as sharp or as good as it used to be. The desktop of popularly known operating systems like macOS and Windows 10 usually come with options which provides the user with the ease of quickly zooming in (just like eagles do) on just what they need. We will be considering how we can find, turn them on and equally use them.
Read Also: 16 Best Tweaking Settings For Configuring Newly Purchased MacBook Pro
How to Use The Zoom Function in MacOS
Users of Mac OS equally have their own options which they use for zooming in on items on the desktop or on applications. In order for the users to gain access to them, they have to be enabled first. Steps to enable the zoom function in mac OS includes:
Open Settings and the select Dock>Accessibility>Zoom.
Select the method which you would wish to use for zooming. Keyboard shortcuts or gestures can be used (shipping two fingers up or down) while the control key is being held down.
If you prefer the option of using the keyboard, the default commands available are:
Toggle Zoom : Shift + Command (⌘) + 8
Zoom out : Shift + Command (⌘) + (-)
Zoom in : Shift + Command (⌘) + (=)
After it has been enabled, you can be able to start zooming in or out.
How to Zoom or Magnify the Screen Items in Windows 10 OS
As a computer user, you might be familiar with how to zoom in; you probably might have done it on numerous occasions in applications like Microsoft Word or Edge. However, it can equally be done anywhere on the computer desktop too.
How To: Recover Pc Microsoft Office Word, Powerpoint And Excel Files After Crash
In Windows 10 operating system, doing it is kind of easy and can be done by holding down the Windows key and the (+) key in order to enable the magnifying application. If you then wish to zoom in on out, just press the minus or plus sign that is on the application or just simply press the Windows key and either (+) or (-) on your keyboard.
Just as you can now see, I have been able to zoom in on my desktop up to 300%.
Included in the magnifier are two additional views that you should probably check out which are called Lens and Dock. If you wish to activate Lens, just go to your keyboard and press Control + Alt + L. Doing this allows you to magnify your desktop items up close to the screen.
If you want to enable the Docked mode, press Control + Alt + D. This will immediately keep the magnifier at the top of the screen which is in view.
The dock can be resized anyhow you want it to be. No matter the option you may choose, this particular feature really makes it more convenient for you to either work on your favorite applications or on the desktop. It proves all the more useful in those applications that have clustered buttons and menu which you could easily miss.
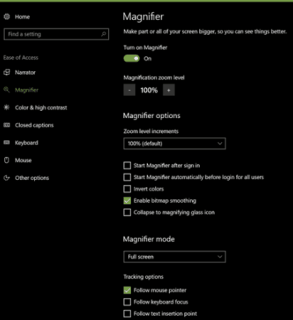
When you feel the need to make any sort of changes or reconfiguration to the way the magnifier operates, just open Settings>Ease of Access>Magnifier. While in this environment, you have the option to either calibrate the default zoom level, or select a default mode and select certain tracking options, or even turn it off totally.
This is virtually all there is about it. Having followed the instructions carefully, you can now see all those tiny items that are on your computer’s screen clearly and this eliminates the need of having to go make long term changes such as changing the resolution of your screen or the scale and layout.
Something else that you can find very useful with the zoom feature is that it comes in quite handy for explained videos of you do use such applications like Camtasia Studio. So, it is needless for you to bother straining your eyes to clearly see tiny items on your computer screen when you have all these options made available to you.
Try them and give us feedback on how it worked for you, and don’t forget to share this post to friends who might be in need of such Personal Computer tutorial on social media platforms. Thank you.


